
Last updated on March 2nd, 2024 at 11:39 am
Plant propagation is a fascinating aspect of gardening that allows you to create new plants from existing ones. Among the array of propagation techniques, the “Air layering propagation method” stands out as a particularly effective means, especially for plants with woody stems. While methods like seed sowing and stem cutting are well-known, air layering offers unique advantages, particularly for species that prove challenging to root from cuttings.
The air layering propagation method provides a way to encourage root growth on a branch while it remains attached to the parent plant, ultimately leading to the creation of a new, independent plant. By promoting root development in this manner, air layering circumvents some of the obstacles encountered with traditional propagation methods, such as the need for specific environmental conditions or the susceptibility of certain species to rot or disease.
Join us as we delve into the intricacies of air layering, exploring its principles, techniques, and applications, and discover how you can harness this method to expand and enrich your garden with a diverse array of thriving plants.
Contents
- 1 Understanding Air Layering Propagation Method:
- 2 Selecting the Best Candidates for the Air Layering Propagation Method:
- 3 Materials Needed for the Air Layering Propagation Method:
- 4 Step-by-Step Guide to Air Layering Propagation Method:
- 5 FAQs
- 5.1 What types of plants are best suited for the air layering propagation method?
- 5.2 Can the air layering propagation method be done year-round, or are there specific seasons when it’s best to attempt it?
- 5.3 Do I need to use rooting hormone when air layering plants?
- 5.4 What should I do if my air-layered plant doesn’t develop roots?
- 6 The Rewards of the Air Layering Propagation Method in Gardening
- 7 Author
Understanding Air Layering Propagation Method:
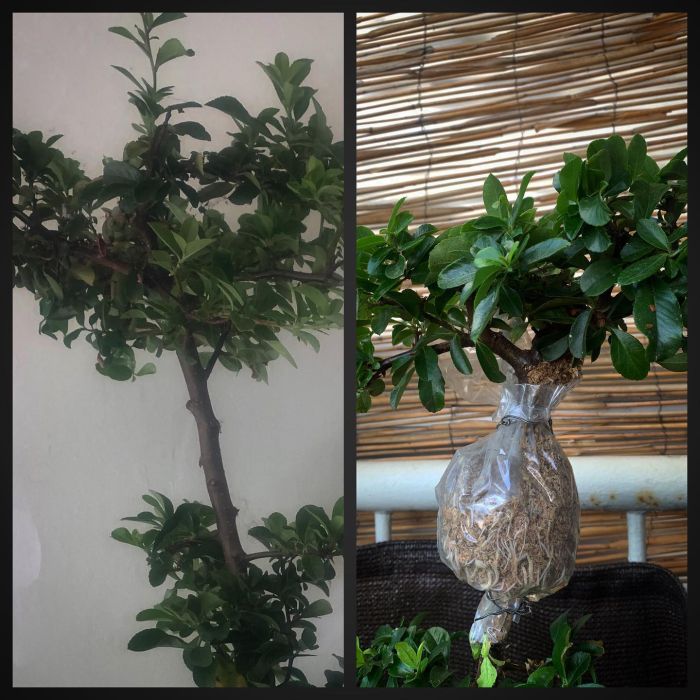
Image credit:#mong00z
Air layering, also known as marcotting, is a technique where you encourage roots to form on a branch while it is still attached to the parent plant. This creates a new, independent plant that can be separated and potted once the roots have developed sufficiently. The advantage of air layering lies in its ability to produce larger, more mature plants compared to traditional cuttings.
This method is particularly advantageous for woody plants with thick stems or those that are difficult to propagate by other means. By inducing root growth directly on the branch, the “Air layering propagation method” bypasses some of the challenges associated with rooting cuttings, such as slow root development or failure to establish roots.
Additionally, air layering allows you to propagate plants without causing harm to the parent plant, as it does not require removing sections or damaging the main stem. This makes it an ideal choice for conserving rare or valuable plant specimens while expanding your garden collection.
Selecting the Best Candidates for the Air Layering Propagation Method:
Rhododendron, Camellia, Azalea, Holly, and Magnolia:
These herbaceous tropical indoor plants and woody outdoor ornamentals thrive in environments conducive to aerial root development, making them prime candidates for air layering. With their lush foliage and vibrant blooms, they are favored by gardeners seeking to propagate new specimens while preserving the desirable traits of the parent plants.
Nut and Fruit Producers:
Apples, Pears, Pecans, and Citrus:
These valuable crop plants commonly undergo air layering to ensure successful propagation and the preservation of desirable characteristics such as fruit quality, disease resistance, and growth habits. The air layering propagation method offers a dependable method for expanding orchards with genetically identical offspring.
Preferred Ornamentals:
Roses, Forsythia, Honeysuckle, Boxwood, and Wax myrtle:
These plants demonstrate remarkable suitability for air layering propagation method, responding positively to the process and providing gardeners with a straightforward means of propagation. Whether enhancing flower gardens, creating hedges, or improving landscaping projects, air-layered specimens of these plants quickly establish themselves, adding beauty and structure to outdoor spaces.
Materials Needed for the Air Layering Propagation Method:
- Sharp knife or pruning shears
- Rooting hormone (optional)
- Sphagnum moss or moist peat moss
- Plastic wrap or aluminum foil
- Twine or plant ties
- Clear plastic bag (optional)
- Watering can or spray bottle
Step-by-Step Guide to Air Layering Propagation Method:
Choosing a Healthy Branch:
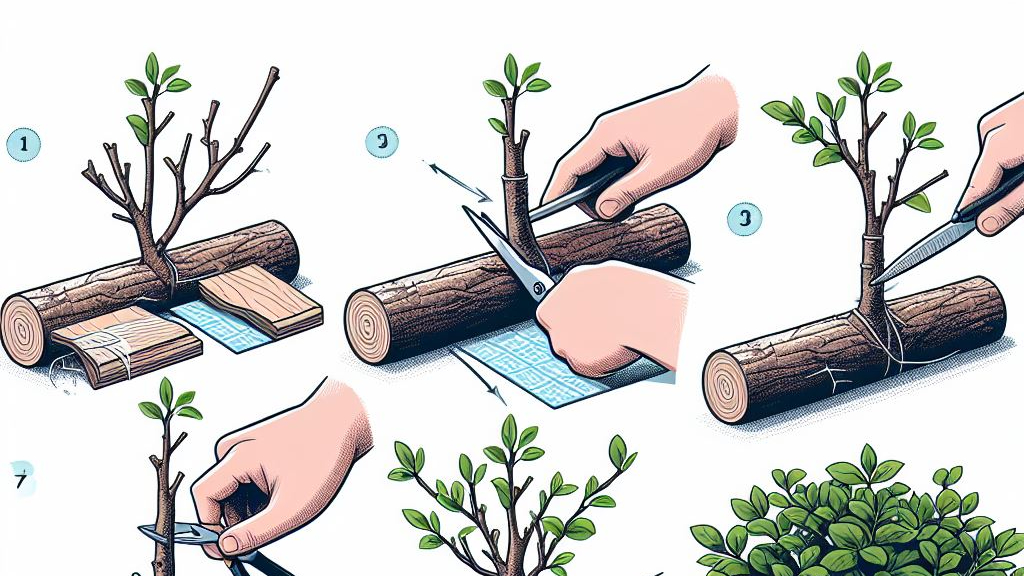
Begin by carefully selecting a branch from the parent plant. Opt for a branch that is healthy, mature, and has a diameter of approximately 1/2 to 1 inch. It’s important to choose a branch of adequate size as it will provide sufficient nutrients and support for root development. Avoid selecting branches that are either too young or too old, as they may not root successfully. A healthy branch will have smooth bark, and vibrant foliage, and show no signs of disease or damage.
Preparing the Branch:
Once you have selected a suitable branch, it’s time to prepare it for the air layering propagation method. Using a sharp knife or pruning shears, make a 1-2 inch diagonal cut on the selected branch, about halfway through its diameter. Then, make another similar cut about an inch below the first cut. These cuts will serve as the points where roots will develop.
After making the cuts, carefully remove the strip of bark and cambium layer between the two cuts, exposing the inner wood. This process is crucial as it interrupts the flow of nutrients and hormones, stimulating the formation of roots in the wounded area. Be sure to make clean, precise cuts to maximize the success of the air layering process.
Applying Rooting Hormone:
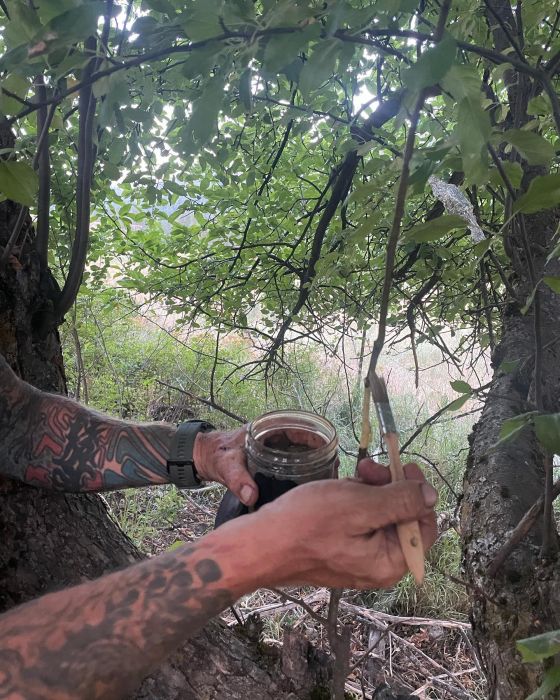
Image credit:#jason.n.gardner
Before delving into the application process of the air layering propagation method, it’s essential to grasp the role of rooting hormones in stimulating root growth. Rooting hormone contains auxins, natural plant hormones that promote root development. This optional step can significantly enhance the success rate and speed of the air layering propagation method.
Reading Manufacturer’s Instructions:
Begin by carefully reviewing the manufacturer’s instructions provided with the rooting hormone product. These instructions outline the proper application method and any safety precautions to be observed. Adhering to these guidelines ensures optimal results and minimizes any risks associated with the use of rooting hormone.
Application Process:
Using a small brush or cotton swab, dip into the rooting hormone powder or gel. Ensure thorough coating of the tool with the hormone. Then, gently apply the hormone to the exposed area of the branch where the bark and cambium layer have been removed. Evenly cover the entire exposed area with a thin layer of rooting hormone.
Proceeding with Air Layering:
After applying the rooting hormone, continue with the air layering process as outlined in the previous steps. Wrap the exposed area of the branch with moist sphagnum moss or peat moss and secure it in place with plastic wrap or aluminum foil. Maintaining a moist environment around the wounded area is crucial for encouraging root growth, regardless of whether the rooting hormone is used.
Optional but Beneficial:
While rooting hormone is optional, it can provide an extra boost to the air layering process. By stimulating root development, the rooting hormone increases the likelihood of successful root formation and ultimately leads to establishing a healthy, independent plant through the air layering propagation method.
Packing with Moist Moss:
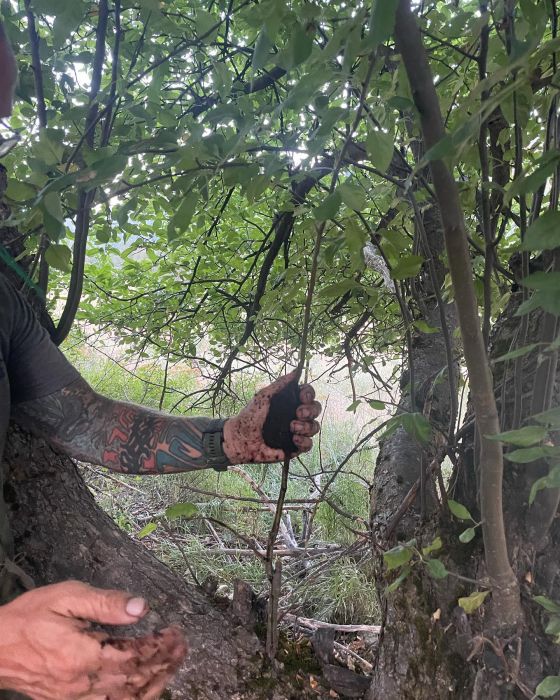
Image credit:#jason.n.gardner
Selecting the Moss:
Begin by choosing either sphagnum moss or peat moss for packing around the exposed area of the branch. Both types of moss retain moisture well, creating an ideal environment for root development. Ensure the moss is moist but not overly wet, as excessive moisture can lead to rotting.
Preparing the Moss:
Take a handful of the chosen moss and gently squeeze out any excess water to achieve the desired level of moisture. The moss should be damp to the touch but not dripping. This ensures that it provides adequate moisture for root growth without becoming waterlogged.
Packing Around the Exposed Area:
Carefully place the moist moss around the exposed area of the branch where the bark and cambium layer have been removed. Ensure that the moss completely covers the wounded area, forming a snug and secure seal. Use your fingers to gently press the moss in place, ensuring good contact with the branch.
Extending Above and Below:
Extend the packed moss a few inches above and below the exposed area on the branch. This extra coverage helps to maintain moisture levels and provides additional support for root development. The moss should create a thick layer around the branch, creating a moist and protective environment conducive to root growth.
Securing in Place:
Once the moss is packed around the branch, carefully wrap the area with plastic wrap or aluminum foil to hold it in place. Make sure the wrap is snug but not too tight, allowing for some air circulation. This protective covering helps to retain moisture and create a humid microclimate around the wounded area, promoting successful root formation.
Packing the exposed area with moist moss and ensuring proper coverage creates an optimal environment for root development during the air layering propagation method. The moss provides essential moisture and support, facilitating the growth of healthy roots and ultimately leading to the establishment of a new plant.
Wrapping with Plastic:
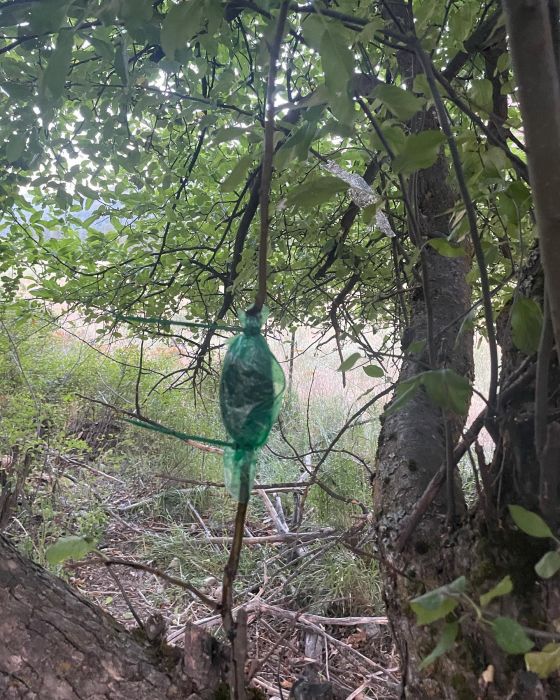
Image credit:#jason.n.gardner
Preserving Moisture:
After packing the moss around the exposed area of the branch, it’s crucial to wrap it with plastic wrap or aluminum foil to maintain the moisture levels necessary for root development. This protective layer prevents the moss from drying out too quickly and creates a humid environment conducive to root growth. Ensure that the entire moss-covered area is securely wrapped to prevent moisture loss.
Choosing the Right Material:
Opt for either plastic wrap or aluminum foil for wrapping the moss-covered area. Both materials effectively hold moisture in place and create a barrier against drying out. Plastic wrap is flexible and easy to manipulate, while aluminum foil provides durability and protection against sunlight. Select the material that best suits your needs and preferences.
Securing the Wrap:
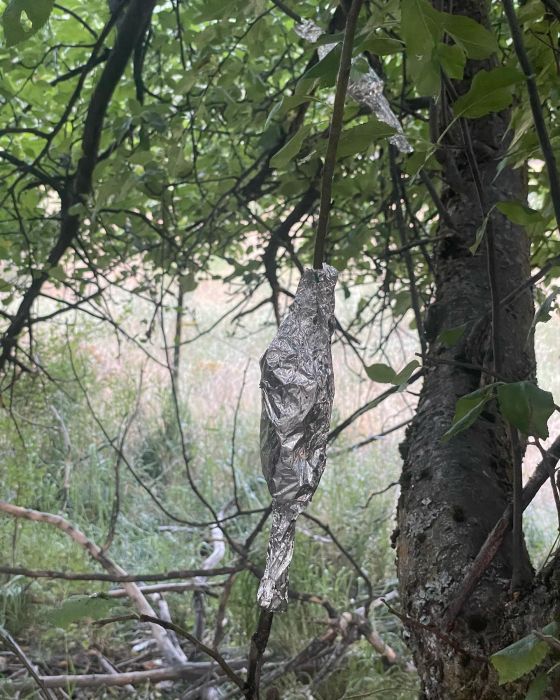
Image credit:#jason.n.gardner
Once the plastic wrap or aluminum foil is in place, use twine or plant ties to secure it firmly around the branch. Make sure to tie the wrap securely but not too tightly, allowing for some air circulation. This prevents the wrap from constricting the branch and ensures that moisture is retained within the enclosed area.
Ensuring Proper Air Circulation:
While securing the wrap, it’s essential to maintain adequate air circulation around the moss-covered area. Avoid wrapping the branch too tightly, as this can restrict airflow and lead to issues such as mold or rot. Instead, leave some space between the wrap and the branch to allow for the exchange of air.
Importance of Secure Wrapping:
A tightly secured wrap prevents moisture loss and helps create an optimal environment for root development. By ensuring that the plastic wrap or aluminum foil is securely in place, you maximize the chances of successful air layering and the formation of healthy roots.
Wrapping the moss-covered area with plastic wrap or aluminum foil and securing it properly creates a protective barrier that retains moisture and promotes root growth. This step is essential in the air layering propagation method as it creates the ideal conditions for developing new roots and ensures the success of the propagation process.
Monitoring and Maintaining the Moss:
Regular inspection of the moss is crucial to ensure that it remains adequately moist throughout the air layering process. This involves:
Frequency of Checks:
It’s advisable to check the moss regularly, ideally every few days, to monitor its moisture levels. Consistent monitoring allows you to intervene promptly if the moss shows signs of drying out.
Signs of Dryness:
Look for visual cues indicating dryness, such as a lighter color or a dry texture to the touch. These signs suggest that the moss is losing moisture and needs immediate attention.
Replenishing Moisture:
If you observe any signs of dryness, it’s essential to act quickly to prevent damage to the developing roots. Use a watering can or spray bottle to mist the moss with water, ensuring thorough coverage. Be careful not to overwater, as excessive moisture can lead to rot and other issues.
Avoiding Overwatering:
While it’s crucial to maintain adequate moisture levels, it’s equally important to avoid overwatering the moss. Overwatering can saturate the moss, depriving the developing roots of oxygen and promoting the growth of harmful pathogens. Aim for a balance by ensuring the moss is damp but not waterlogged.
Consistency in moisture levels is essential for successful root development. By regularly checking and maintaining the moisture of the moss, you create a stable environment conducive to root growth. This consistent care increases the likelihood of successful air layering and the establishment of healthy roots.
Waiting for Root Development:
Understanding Timing:
The timeline for root development can vary depending on factors such as the plant species and environmental conditions. Generally, roots should begin to form within a few weeks to a few months after air layering. During this waiting period, it’s essential to exercise patience and avoid unnecessary disruptions to the air layering propagation method.
Monitoring Progress:
While waiting for root development, you can periodically check on the progress by gently peeling back the plastic wrap or aluminum foil covering the moss. Take care not to disturb the moss or the wounded area of the branch. Look for signs of root growth, such as the emergence of small white roots or the development of callus tissue around the cut area.
Potting the New Plant:
Root Development Milestone:
Once roots have formed and are several inches long, it’s time to pot the newly rooted section. This milestone indicates that the plant has successfully established roots and is ready to be transplanted into its own pot.
Preparing for Potting:
To pot the new plant, carefully cut below the rooted area with a sharp knife or pruning shears. Make a clean, diagonal cut to ensure minimal damage to the roots. Prepare a pot filled with well-draining soil, ensuring that it is large enough to accommodate the newly rooted section.
Planting the New Plant:
Place the newly rooted section into the pot, ensuring that the roots are spread out evenly and covered with soil. Gently press the soil around the base of the plant to secure it in place. Water the newly potted plant thoroughly to help settle the soil and provide hydration to the roots.
Care and Maintenance:
After potting the new plant, place it in a location with appropriate light and temperature conditions for its specific needs. Continue to monitor the soil moisture levels and water the plant as needed. With proper care and maintenance, the newly potted plant will continue to grow and thrive in its new environment.
Providing Care for the Potted Plant:
Optimal Light Conditions:
Place the potted plant in a location with bright, indirect light. Avoid exposing it to direct sunlight, as this can scorch the delicate foliage and cause stress to the plant. Bright, indirect light provides the ideal balance of light intensity for healthy growth.
Consistent Moisture Levels:
Keep the soil moist but not overwatering. Watering the plant evenly whenever the top of the soil dries when touched. Use room-temperature water to avoid shocking the roots with extreme temperatures. Proper hydration is essential for supporting the plant’s growth and development.
Preventing Transplant Shock:
To prevent transplant shock, gradually acclimate the plant to its new environment. Start by placing it in its new location for a few hours each day, gradually increasing the duration for several days. This gradual transition allows the plant to adjust to changes in light, temperature, and humidity without experiencing undue stress.
Monitoring for Signs of Stress:
Regularly check the plant’s signs of stress, such as yellowing leaves, wilting, or stunted growth. These symptoms may indicate that the plant is not receiving adequate light, water, or humidity. Adjust the care regimen accordingly to address any issues and ensure the plant’s continued health and vitality.
Fertilizing:
After the potted plant has become established in its new environment, consider fertilizing it periodically to provide essential nutrients for growth. Choose a balanced fertilizer specifically formulated for indoor plants and apply it according to the manufacturer’s instructions. Avoid over-fertilizing, as this can lead to nutrient imbalances and damage to the plant.
FAQs
What types of plants are best suited for the air layering propagation method?
Air layering is particularly effective for woody plants with thick stems, including ornamental shrubs, fruit-bearing trees, and flowering vines. Some popular candidates for air layering include rhododendrons, camellia, azaleas, roses, and citrus trees.
Can the air layering propagation method be done year-round, or are there specific seasons when it’s best to attempt it?
While air layering propagation method can be done throughout the year, it’s often most successful when performed during the plant’s active growing season. This typically occurs in spring or early summer when plants are actively producing new growth.
Do I need to use rooting hormone when air layering plants?
While rooting hormone is optional, it can enhance the success rate of air layering by stimulating root growth. Rooting hormone contains auxins, natural plant hormones that promote root development. Using rooting hormone may lead to faster and more robust root formation.
What should I do if my air-layered plant doesn’t develop roots?
If your air-layered plant fails to develop roots within a reasonable timeframe, you may need to reevaluate the process. Ensure that you’ve followed all steps correctly, including selecting a healthy branch, making clean cuts, and maintaining proper moisture levels. You can also try using rooting hormone or adjusting environmental conditions to encourage root growth.
The Rewards of the Air Layering Propagation Method in Gardening
The air layering propagation method is a valuable tool for gardeners, offering ease and efficiency in creating new plants. By following the outlined steps, you can propagate a variety of woody plants, enriching your garden and fostering a deeper connection with nature. This technique unlocks the potential of existing plants, retaining desirable traits in offspring.
Experimentation reveals its versatility with different species, providing endless possibilities for garden expansion. Air layering not only yields new plants but also offers a rewarding experience, fostering a sense of accomplishment and connection with the natural world. Embracing air layering fosters continual learning and growth as a gardener, enriching the garden landscape and deepening appreciation for nature’s wonders.
Author
-
by
-